Cluster Management and Tools
Task Management
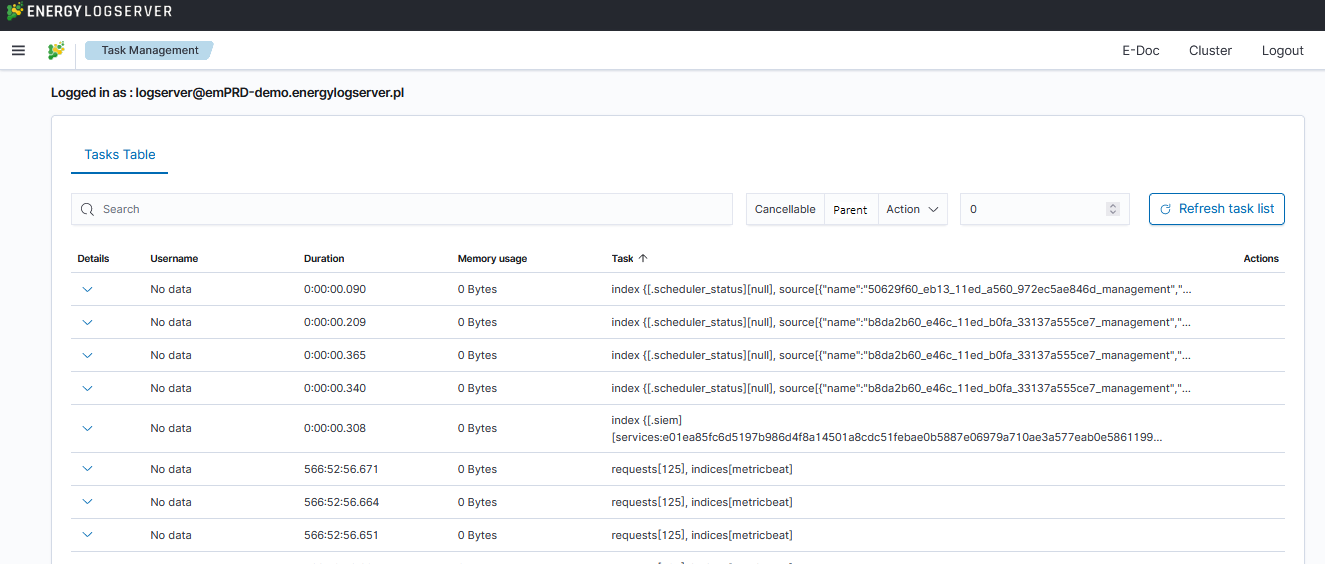
Energy Logserver provides the ability to manage tasks. Table with running tasks is located in Tasks section.
Long Running Query
If query is cancellable trash icon is available in Actions column. (Note: Not every query can be canceled)

Searchbar and filtering
It is possible to search for running tasks using the searchbar. The following filters are available:
Cancellable— filters only cancellable tasks.Parent— filters only parent tasks.Action— filters by action type (e.g.,indices:data/write/bulk).
Additionally, a Duration input field allows you to specify a minimum running time (in seconds) to show only long-running tasks.
The task table displays the following columns: Action, Task ID, Running Time, Username, Memory Usage, and Node.
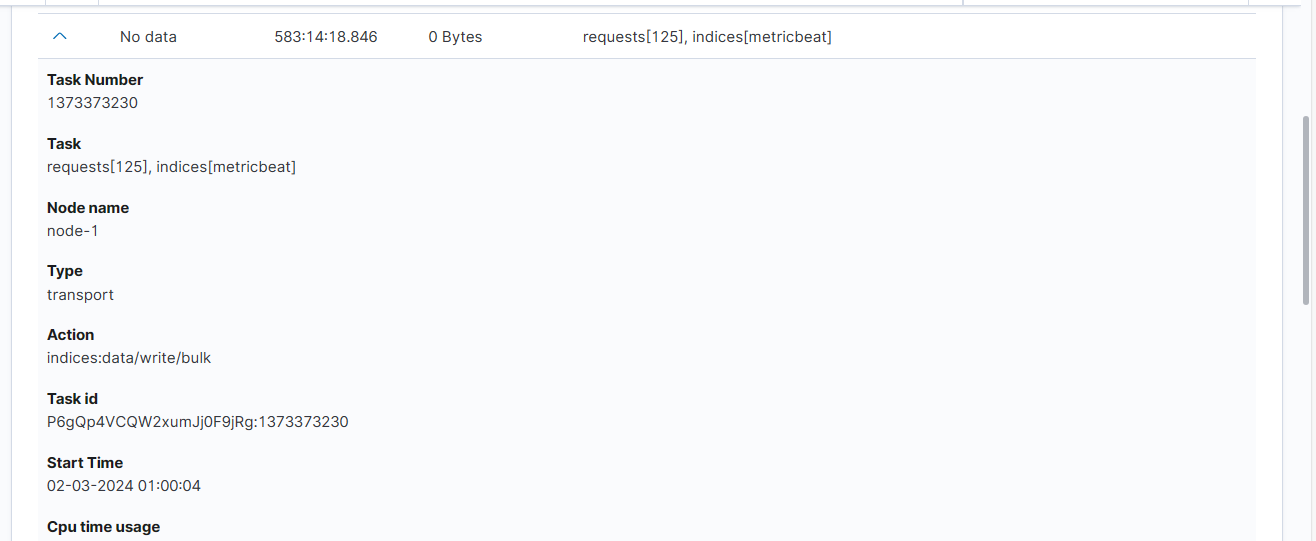
Task Details
Expanding the details column provides more information about a given task. (Note: Depending on the type of task, different information may be provided.)
Cluster Console - Cluster Health
Cluster Console (Cerebro-based) is the cluster administration tool that allows you to perform the following tasks:
monitoring and management of indexing nodes, indexes and shards:
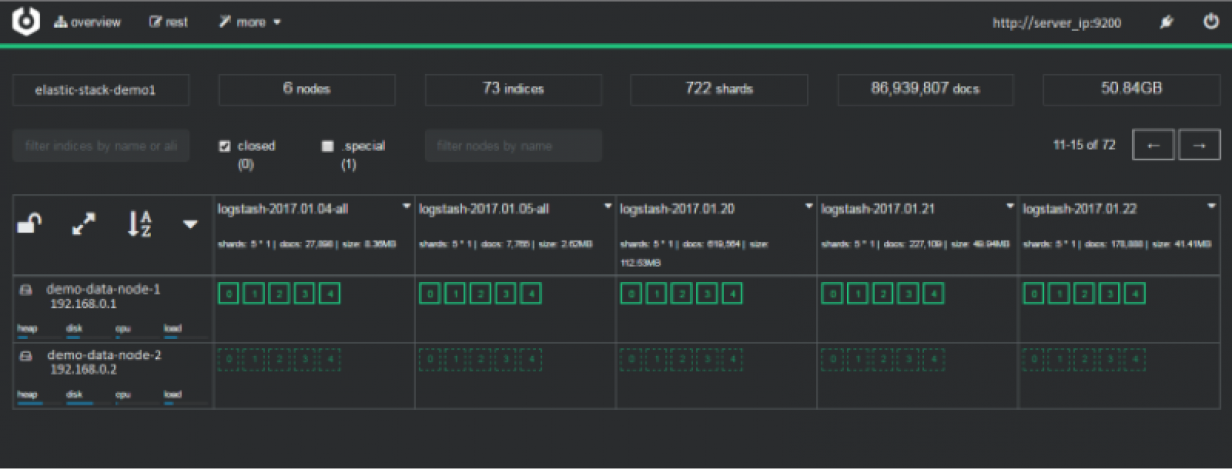
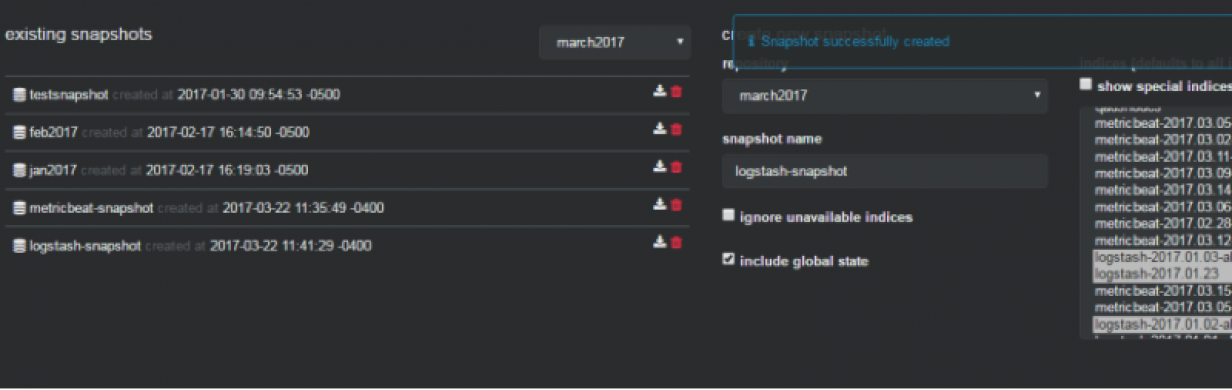
monitoring and management of index snapshots:
informing about problems with indexes and shards:
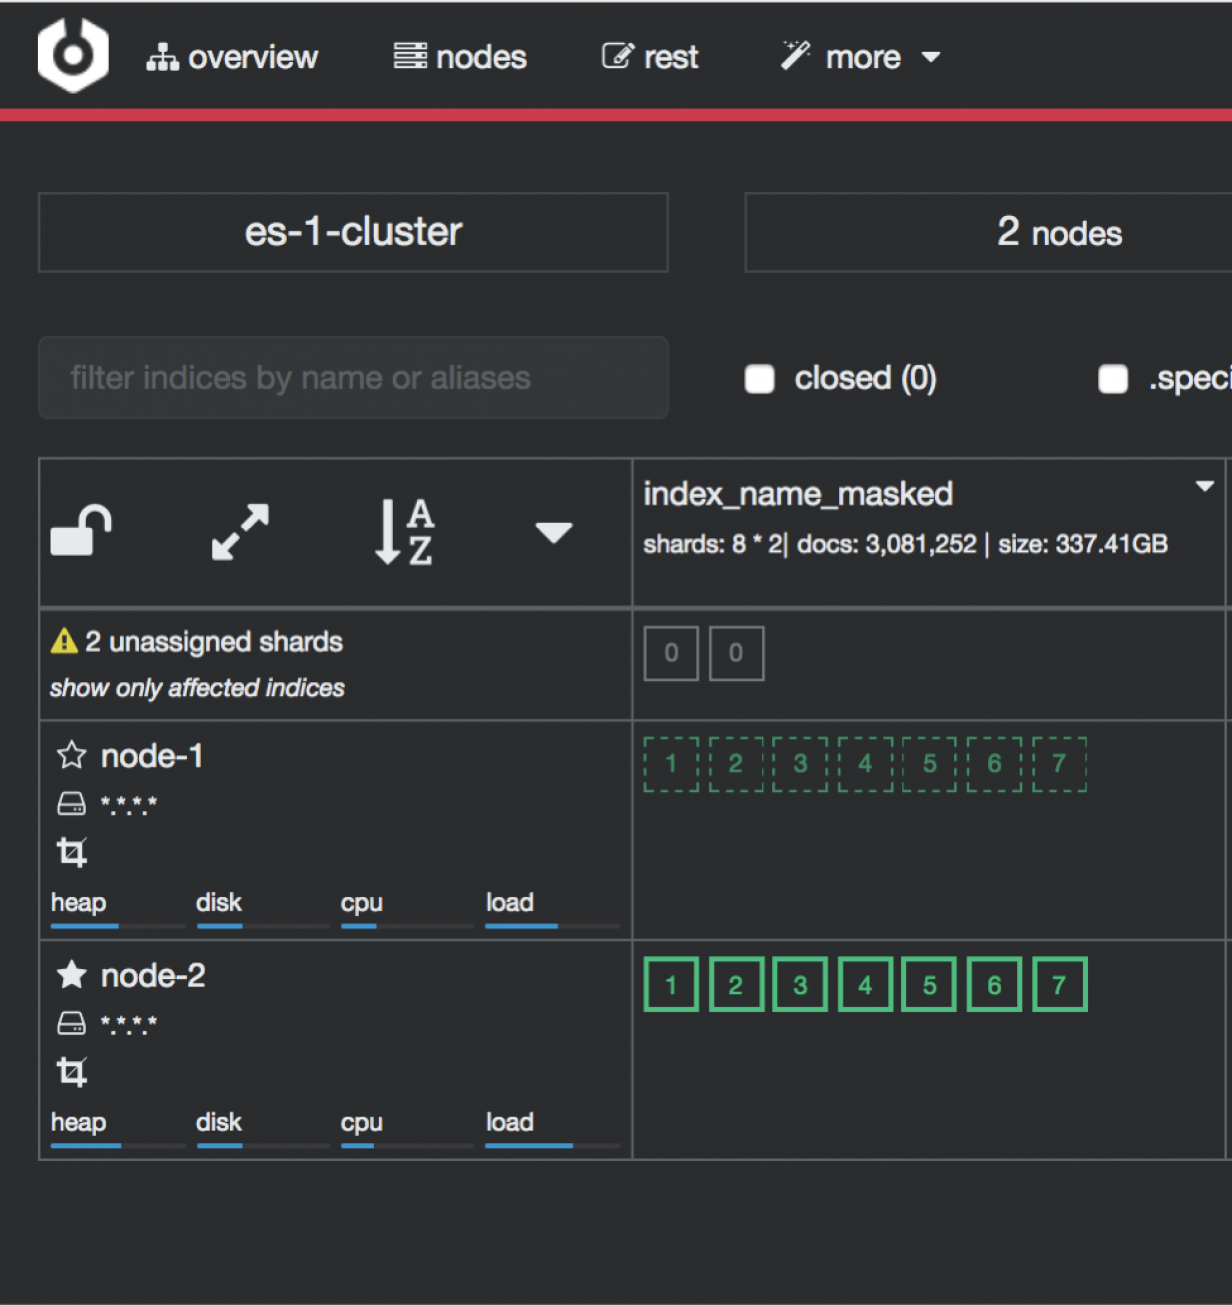
Access to the Cluster module is possible through the button in the upper right corner of the main window.

Cluster Console runs on port 5602 by default. Its configuration file is located at /opt/cerebro/conf/application.conf.
Data dump
Energy Logserver includes the elasticdump utility for exporting and importing index data between clusters or to/from JSON files. The tool is bundled with the system installer.
Data Node index management tool
The Index Management plugin provides GUI-based index operations such as close, delete, force merge, and rollover. Access it from Management → Index Management. For details on index operations, see the Index Management section.
Cross-cluster Search
Cross-cluster search lets you run a single search request against one or more remote clusters. For example, you can use a cross-cluster search to filter and analyze log data stored on clusters in different data centers.
Configuration
Use
_clusterAPI to add at least one remote cluster:curl -u user:password -X PUT "localhost:9200/_cluster/settings?pretty" -H 'Content-Type: application/json' -d' { "persistent": { "cluster": { "remote": { "cluster_one": { "seeds": [ "192.168.0.1:9300" ] }, "cluster_two": { "seeds": [ "192.168.0.2:9300" ] } } } } }'
To search data in index
twitterlocated on thecluster_oneuse following command:curl -u user:password -X GET "localhost:9200/cluster_one:twitter/_search?pretty" -H 'Content-Type: application/json' -d' { "query": { "match": { "user": "kimchy" } } }'
To search data in index
twitterlocated on multiple clusters, use following command:curl -u user:password -X GET "localhost:9200/twitter,cluster_one:twitter,cluster_two:twitter/_search?pretty" -H 'Content-Type: application/json' -d' { "query": { "match": { "user": "kimchy" } } }'
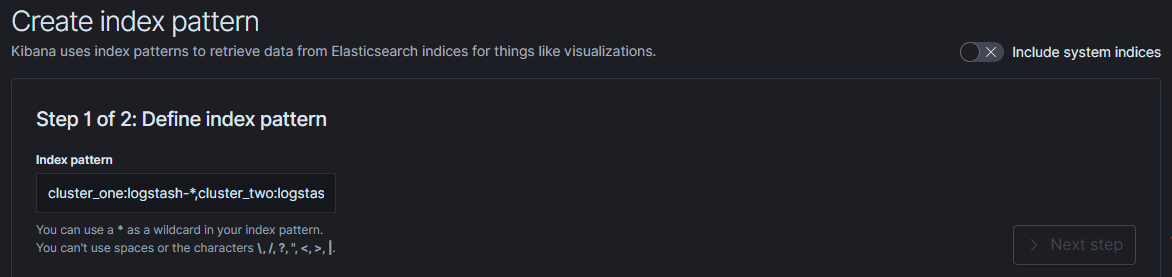
Configure index pattern in GUI to discover data from multiple clusters:
cluster_one:syslog-*,cluster_two:syslog-*
Security
Cross-cluster search uses the Data Node transport layer (default 9300/tcp port) to exchange data. To secure the transmission, encryption must be enabled for the transport layer.
Configuration is in the /etc/logserver/logserver.yml file:
# Transport layer encryption
logserverguard.ssl.transport.enabled: true
logserverguard.ssl.transport.pemcert_filepath: "/etc/logserver/ssl/logserver.crt"
logserverguard.ssl.transport.pemkey_filepath: "/etc/logserver/ssl/logserver.key"
logserverguard.ssl.transport.pemkey_password: ""
logserverguard.ssl.transport.pemtrustedcas_filepath: "/etc/logserver/ssl/rootCA.crt"

logserverguard.ssl.transport.enforce_hostname_verification: false
logserverguard.ssl.transport.resolve_hostname: false
Encryption must be enabled on each cluster.
Sync/Copy
The Sync/Copy module allows you to synchronize or copy data between two Energy Logserver clusters. You can copy or synchronize selected indexes or indicate index pattern.
Sync/Copy Configuration
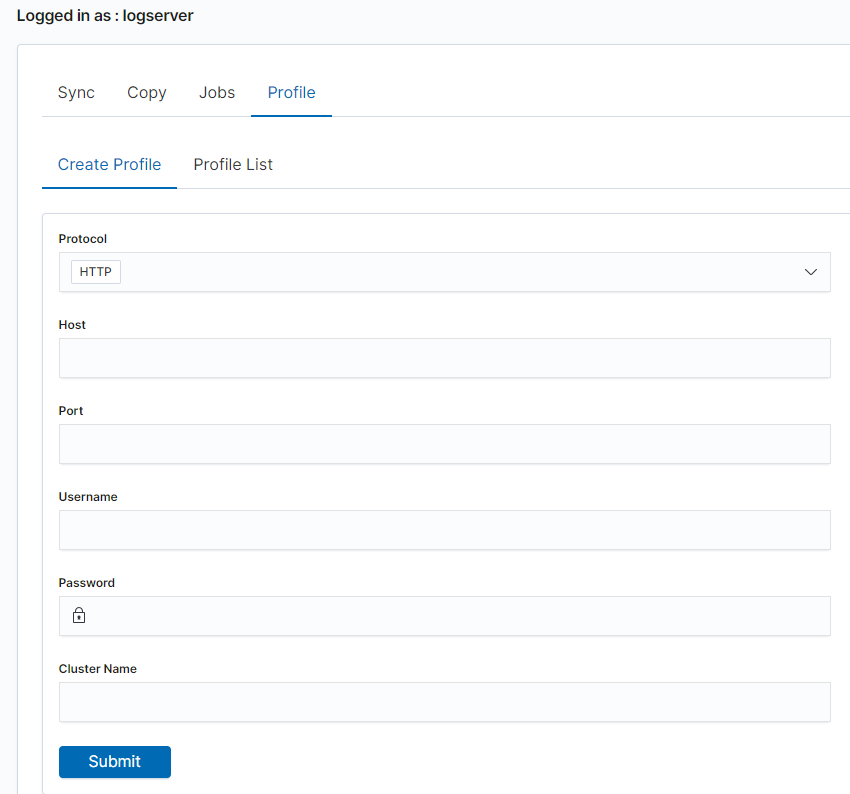
Before starting Sync/Copy, complete the source and target cluster data in the Profile and Create profiletab:
Protocol —
httporhttpsHost — IP address of the ingest node
Port — communication port (default
9200)Username — username that has permission to get and save data on the cluster
Password — password of the above user
Cluster name
When using https, additional SSL/TLS fields are available:
Key file — path to the client key file
Certificate file — path to the client certificate file
Certificate Authority file — path to the CA certificate file
Passphrase — passphrase for the key file (if applicable)
You can view or delete the profile in the Profile List tab.
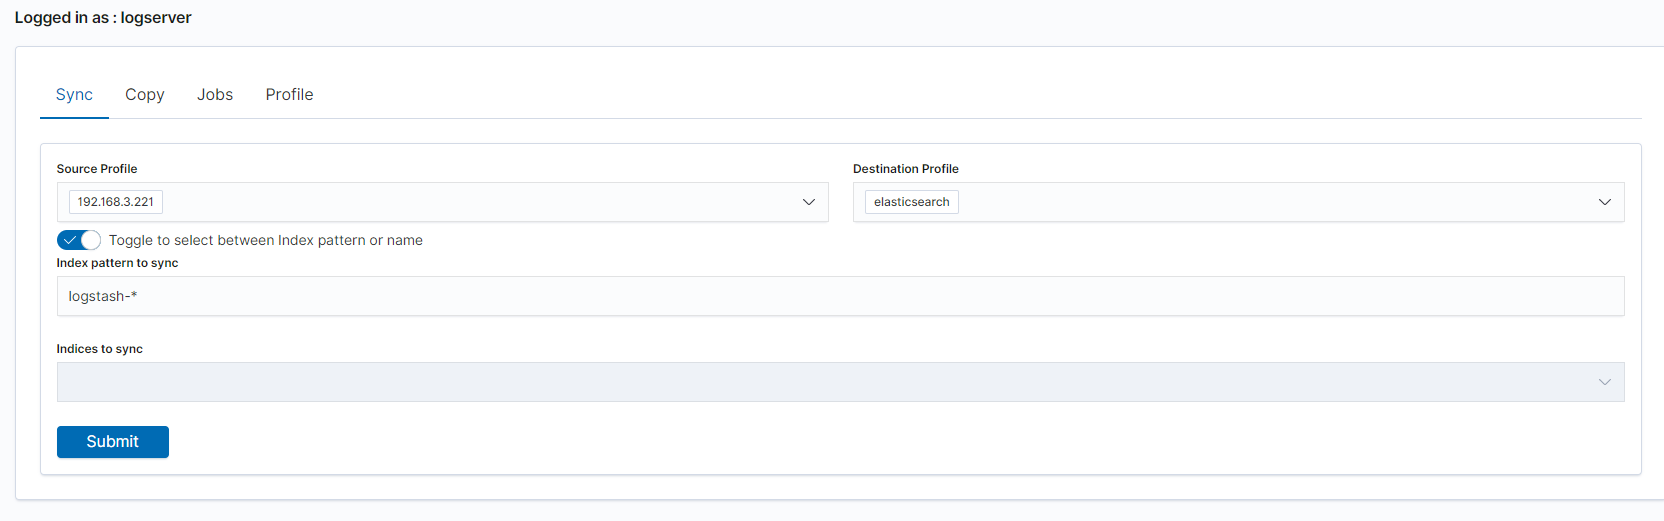
Synchronize data
To perform data synchronization, follow the instructions:
go to the
Synctab;select
Source Profileselect
Destination Profileenter the index pattern name in
Index pattern to syncor use switch
Toggle to select between Index pattern or nameand enter indices name.to create synchronization task, press
Submitbutton
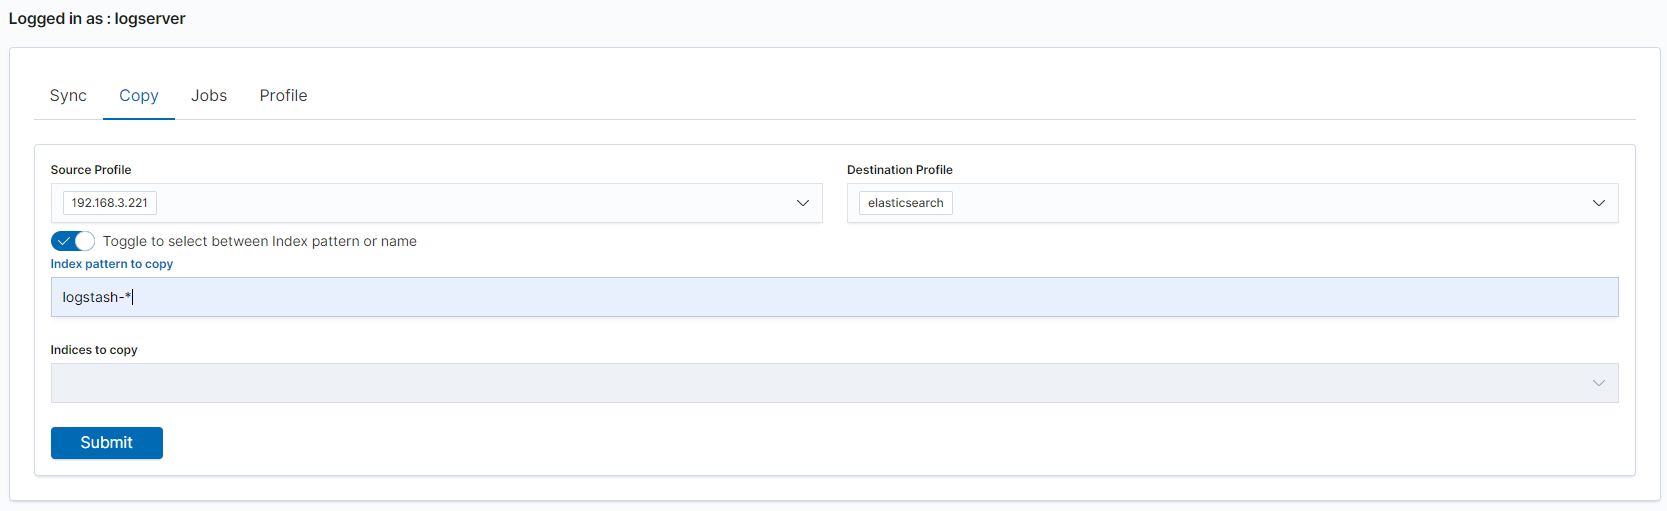
Copy data
To perform data copy, follow the instructions:
go to the
Copytab;select
Source Profileselect
Destination Profileenter the index pattern name in
Index pattern to syncor use switch
Toggle to select between Index pattern or nameand enter indices name.to start copying data press the
Submitbutton
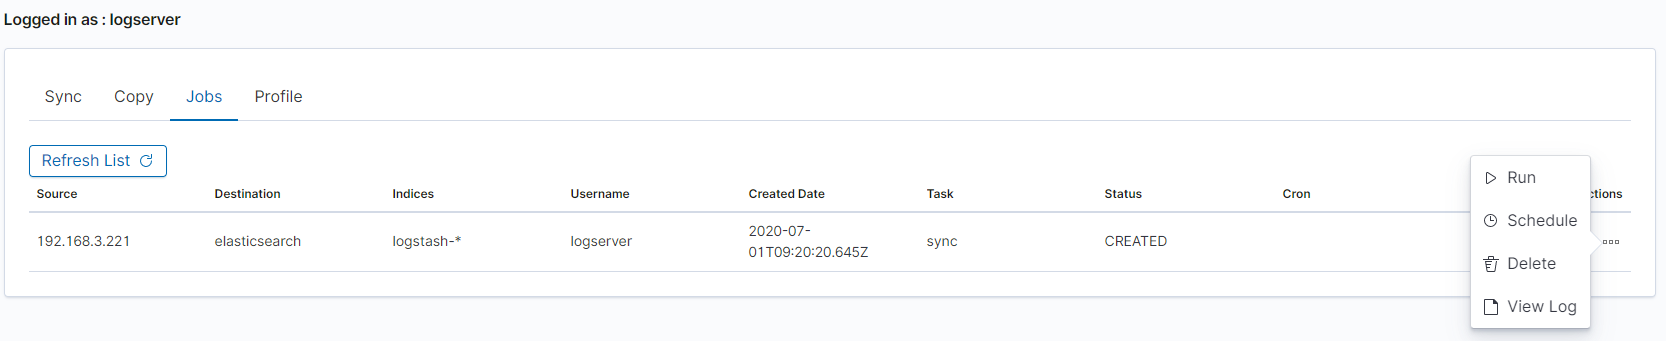
Running Sync/Copy
Prepared Copy/Sync tasks can be run on demand or according to a set schedule.
To do this, go to the Jobs tab. With each task you will find the Action button that allows:
running the task on demand;
enabling the scheduler (Cron format);
disabling the scheduler;
deleting the task;
viewing task logs.
Separating Data Using Index Aliases
Index aliases allow you to expose a filtered subset of an index to specific user groups. This is useful when a single index contains data from multiple sources or tenants and you need to restrict access by role.
Procedure
Create an alias on an index
In the Management Interface, navigate to the index and create an alias scoped to the appropriate tag or filter condition.
Create an index pattern on the alias
In Management → Index Patterns, create a new index pattern using the alias name instead of the original index name.
Assign a role to the index pattern
In Management → Roles, create or update a role and assign read permissions to the alias-based index pattern. Users with this role will only see data accessible through the alias.
Note
This approach works with Energy Logserver’s role-based access control (RBAC) system. The alias acts as a logical view — users assigned the role cannot access the underlying index directly.